디자인 패턴
디자인 패턴은 프로그래밍 과정에서 문제 해결을 위해 반복해서 경험하는 객체와 클래스의 관계를 정리한 것이다. 코코아 프레임워크 역시 여러 가지 상황에 대한 다양한 디자인 패턴이 적용되어 있다. 그 중에서도 객체의 역할에 따라 구분하는 MVC(모델-뷰-컨트롤러) 패턴에 대해 알아보자.
MVC
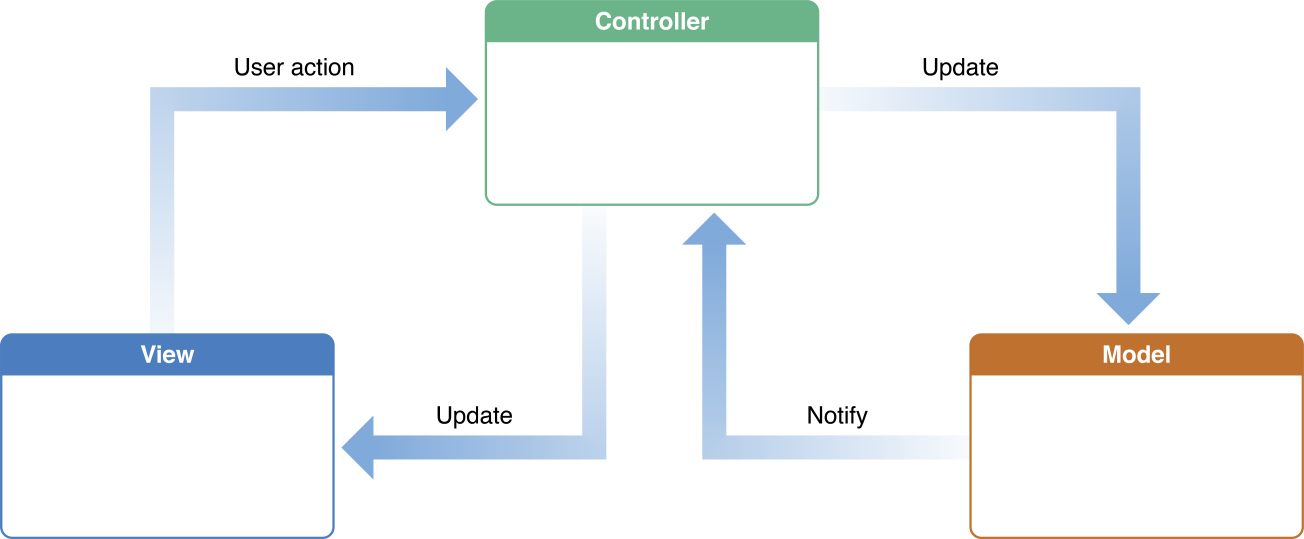
모델
모델 객체는 화면을 구성하거나 내부 처리를 위한 데이터를 추상화해서 타입을 지정한 자료 구조로 표현하고, 데이터를 처리하는 로직을 정의한다. 앱에서 지속적으로 사용하는 데이터는 모델 객체 내부에 캡슐화되고, 파일이나 데이터베이스 같은 영구적인 구조로 저장하기도 한다.
MVC 패턴에서 데이터를 다루는 모델 객체는 화면을 구성하는 뷰 객체와 직접적으로 연결하지 않는다. 데이터에 접근하는 유일한 추상화 객체가 된다. 서버에서 받은 데이터 구조를 컨트롤러와 뷰에서 사용할 때 모델 객체가 기본 처리 단위가 된다.
뷰
뷰 객체는 코코아 프레임워크에서 대체로 UIView 클래스를 상속받아 앱 화면 자체를 그려서 표시하는 역할을 하고, 사용자 선택에 따라 입력을 받거나 피드백을 준다. 일반적으로 뷰 객체가 화면에 표시하는 정보는 모델 객체가 갖고 있는 데이터를 기반으로 한다. 하나의 뷰가 모델 하나와 매칭될 수도 있고, 하나의 뷰를 표현하기 위해서 여러 모델의 데이터가 필요하기도 한다. 반대로 하나의 모델의 데이터가 여러 뷰에서 사용자 입력에 따라 다르게 보여지기도 한다.
뷰 객체는 화면 구성을 위해서 모델 객체와 매우 밀접한 관계를 갖고 있지만, 이런 상호 관계를 끊고 느슨하게 결합하는 것이 MVC 패턴의 핵심 사항이다. 그 상호 관계를 유지하도록 도와주는 역할이 컨트롤러 객체의 역할이다. 따라서 컨트롤러가 연결해주는 모델 객체에 따라서 뷰 객체는 얼마든지 재사용이 가능하다.
컨트롤러
컨트롤러 객체는 뷰 객체와 모델 객체 사이에서 사용자 입력과 데이터 변화에 대한 연결을 해주는 중재자 역할을 한다. 사용자 입력에 따른 새로운 데이터 변화를 확인하고, 관련 모델에 새로운 데이터를 업데이트해준다. 반대로 모델에서 데이터가 바뀌면 뷰에 전달해서 새로운 데이터로 화면에 표시한다.
뷰 객체가 표시하는 화면 구조가 복잡하거나 사용자 입력 방식이 다양할수록 데이터 모델도 상대적으로 덩치가 크고 컨트롤러 객체의 동작이 복잡해진다.
MVC 패턴으로 구현할 때 가장 큰 고민거리는 컨트롤러 객체를 구현하는 코드가 복잡하고 길어진다는 것이다. 이전 화면이나 다음 화면으로 데이터를 전달하는 경우에는 각 화면을 담당하는 컨트롤러 사이에도 데이터를 전달해야 해서 더 복잡해진다. 따라서 가볍고 재사용성이 높은 컨트롤러 객체를 만들기 위해서 다양한 MVC 변형 패턴들을 함께 사용한다.
참조
' > Design Pattern' 카테고리의 다른 글
| 호출 패턴 (0) | 2022.10.30 |
|---|---|
| 응답 체인 패턴 (UIResponder, Hit-Test) (0) | 2022.10.30 |
| 옵저버 패턴 (0) | 2022.10.30 |
| 싱글턴 패턴 (0) | 2022.10.30 |